
There are no products in your shopping cart yet.
Buying guide
Buying guide
Sooner or later, everyone who is involved in photography reaches their limits of creativity and wants to start working with filters, but then you come across such a wide variety of filters that you no longer know which one you should choose or which one you should use. Need. You have ND (gray filters), GND (gray gradient filters) and variable ND filters, but how light or how dark should they be?
In this purchasing guide we will help you determine the right choice.
In this purchasing guide we will help you determine the right choice.
To start with, ND = neutral density or neutral density filters with fixed f-stop. Each ND filter reduces the light that reaches your camera's sensor. The strength is displayed as a number of f-stops. The higher the number, the less light is transmitted to the sensor.
3 – stops or ND8
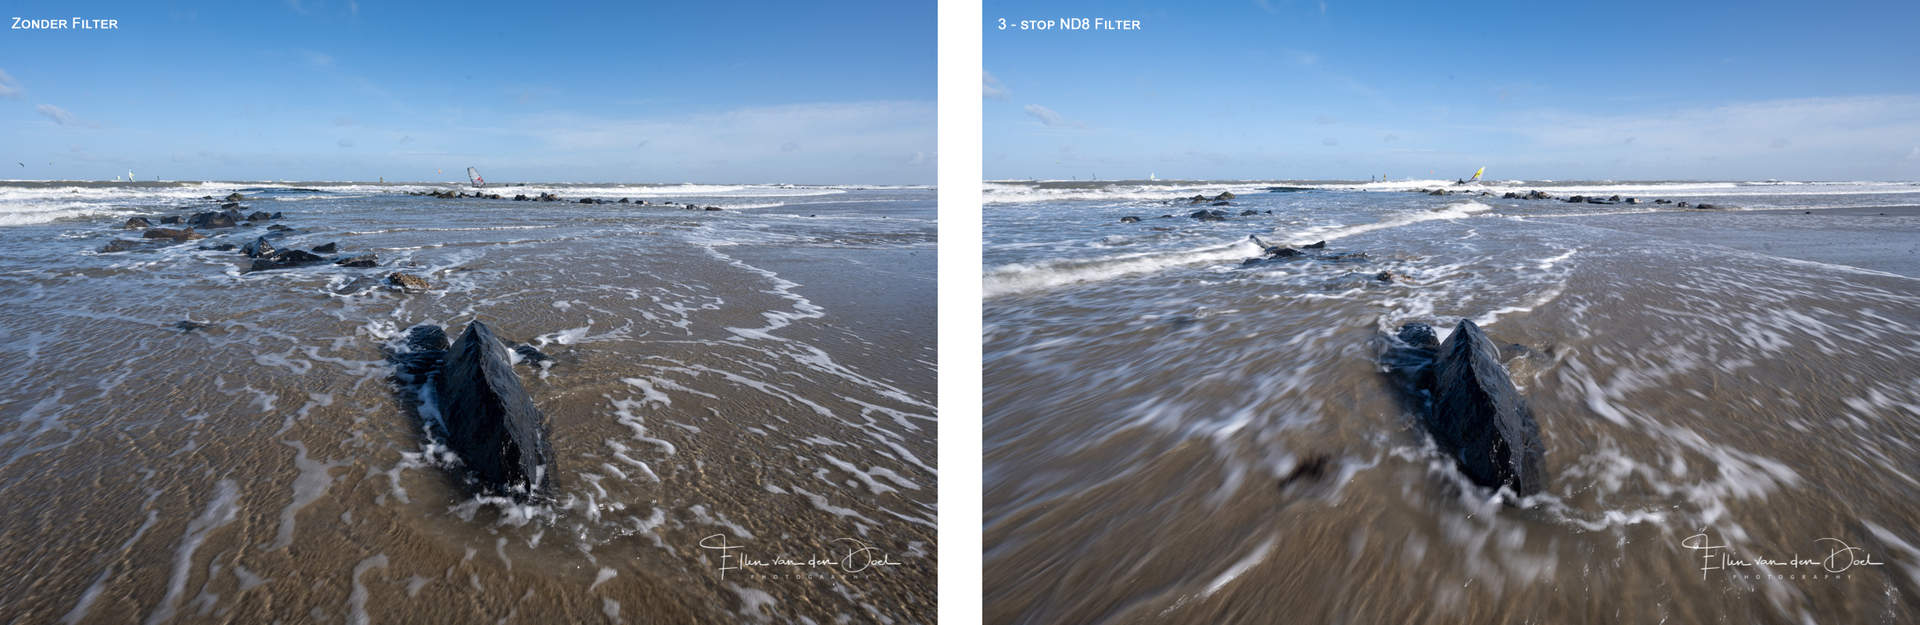
A 3-stop ND8 filter is suitable for weddings, portrait photographers and videographers, but also very useful for landscapes, where long shutter speeds are not required. When photographing weddings, portraits or filming, where you combine a small depth of field with a low ISO, you get the most beautiful photos. In a brightly lit environment, the 3-stop ND8 filter will allow you to shoot wide open aperture f/2.8-4, while maintaining ISO 100-200 with a fast shutter speed, to freeze motion.
Landscape photographers often overlook the 3-stop filter, but it can still be very useful around sunrise and sunset, where you don't want long shutter speeds, to capture cloud areas and create more impact in your photo. A 10-stop filter is often not suitable for sunrise and sunset, as it often goes beyond the ideal exposure range and can result in shutter speeds that exceed sunrise or sunset, leaving you with faint clouds and the sun being just out of its ideal position .
6 – stops or ND64
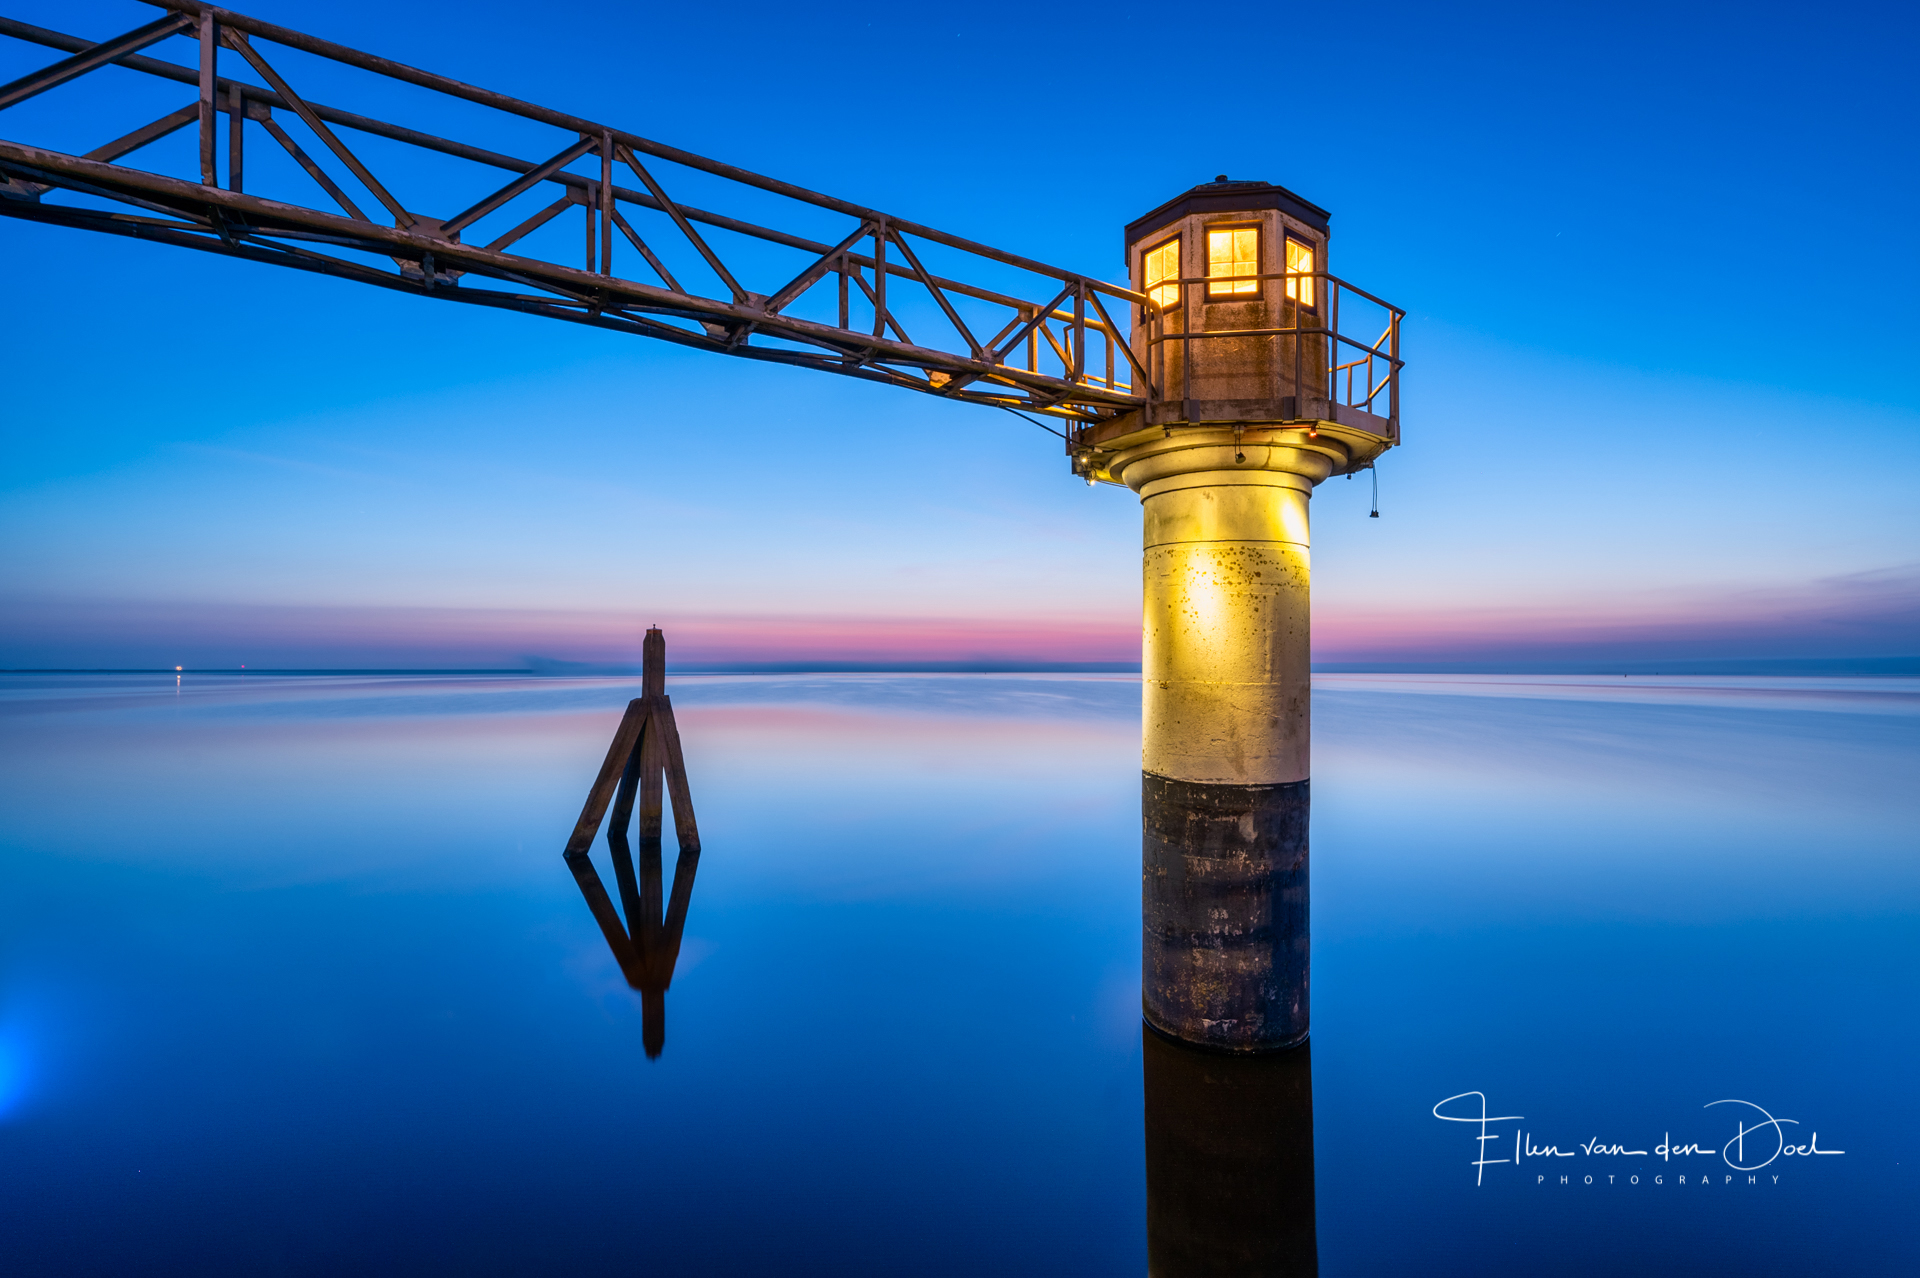
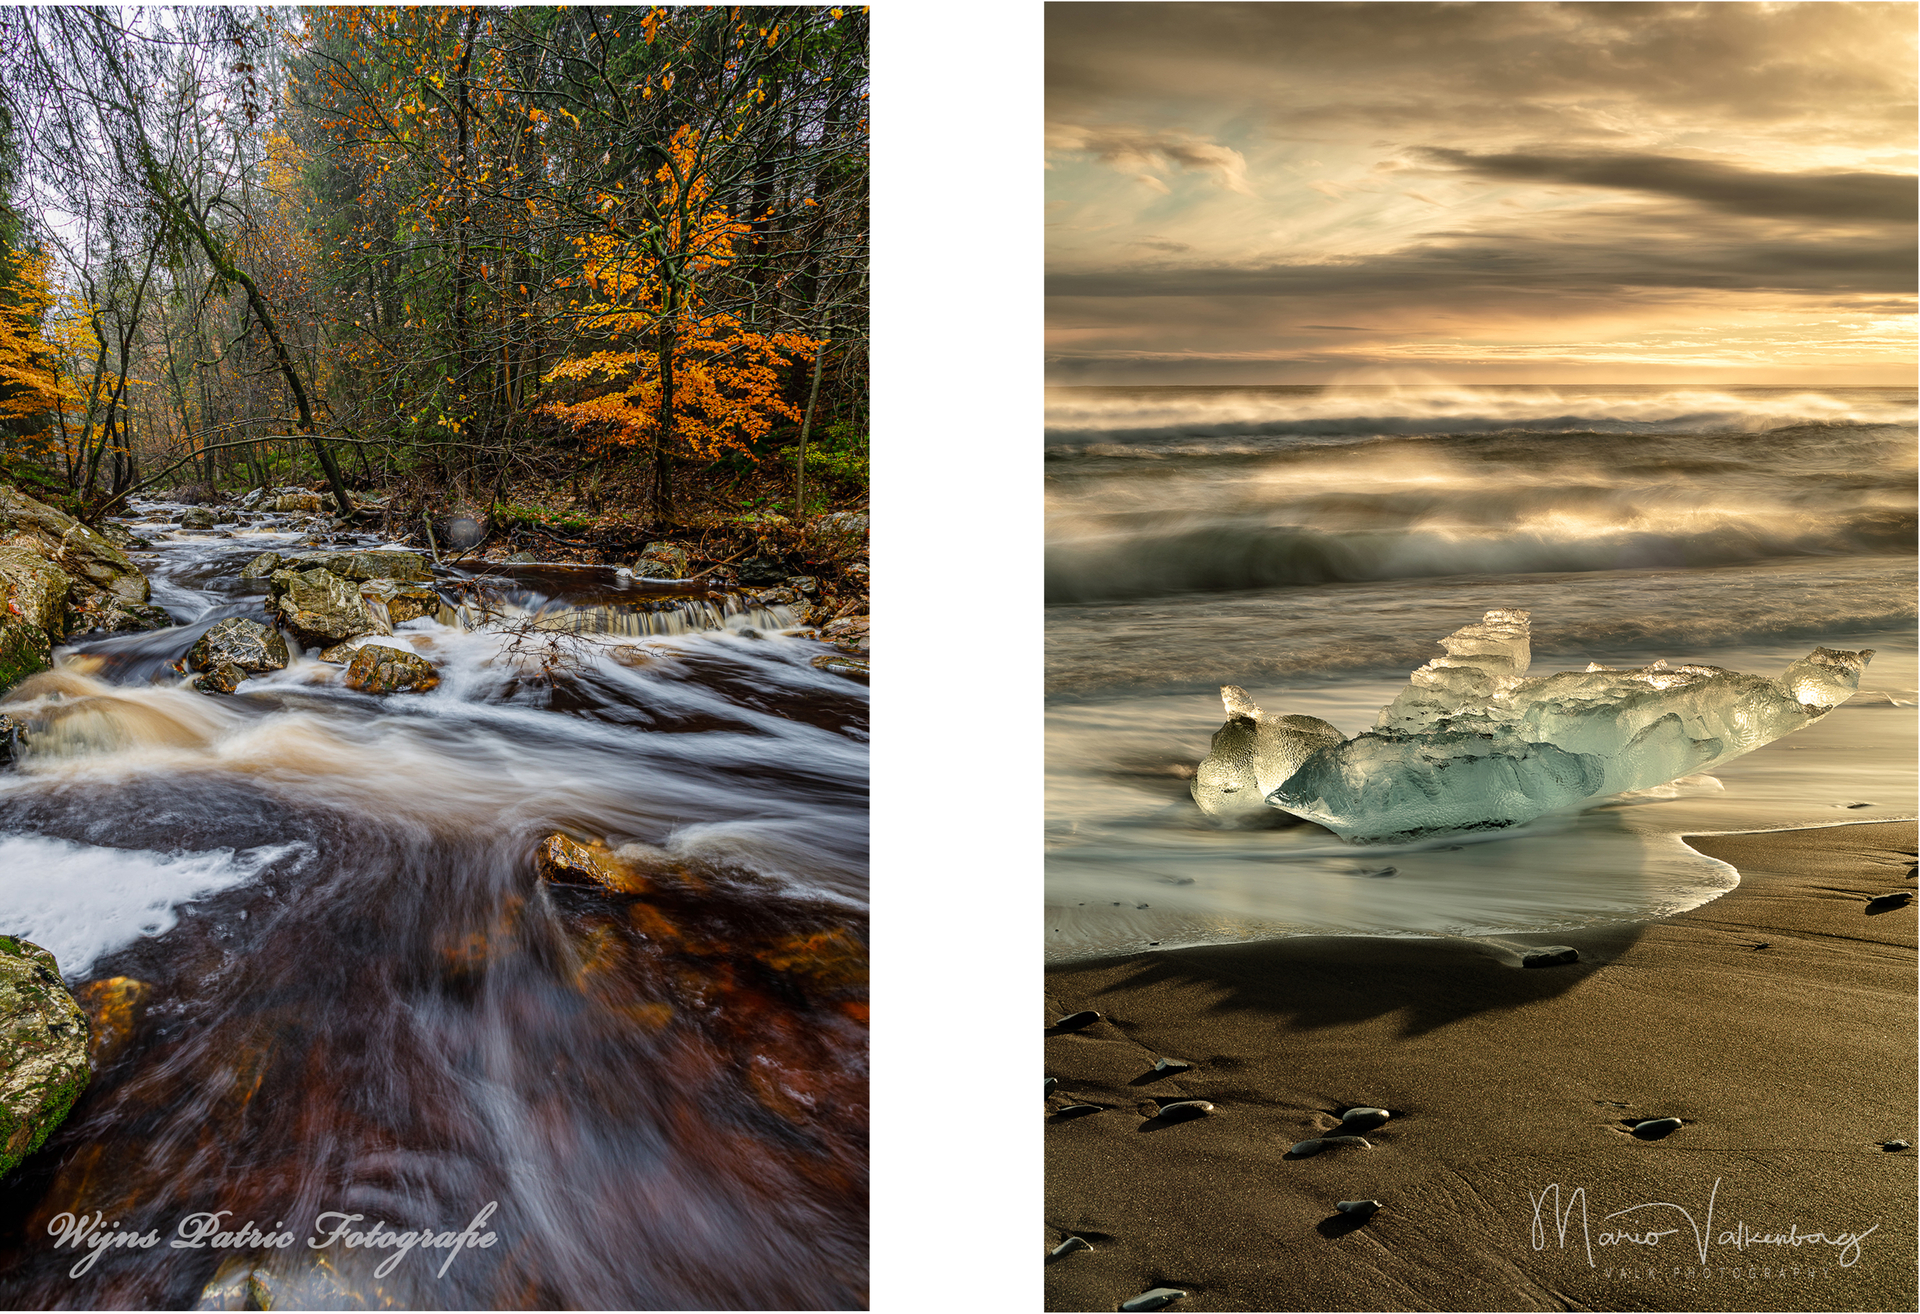
The 6-stop ND64 filter is the landscape photographer's second best friend, right after his inseparable tripod. This filter is the most used and versatile fixed ND filter, ideal for anyone who wants to photograph sunrise, sunset, waterfalls and moving water with long shutter speeds. When a landscape photographer is limited in carrying equipment, this filter will always go with him in his bag. The filter creates the dreamy, hazy effect on the flowing water and chasing clouds. It is also often used in urban environments, where you want to reduce human presence in your composition.
If you mainly photograph landscapes, the ND64 filter is highly recommended. Anyone looking for coastal, urban environments and abstract photos should opt for a 10-stop filter. However, you should also consider shooting with a 6-stop filter at a low ISO of 50-100, or using a 3-stop and a 6-stop together for greater versatility.
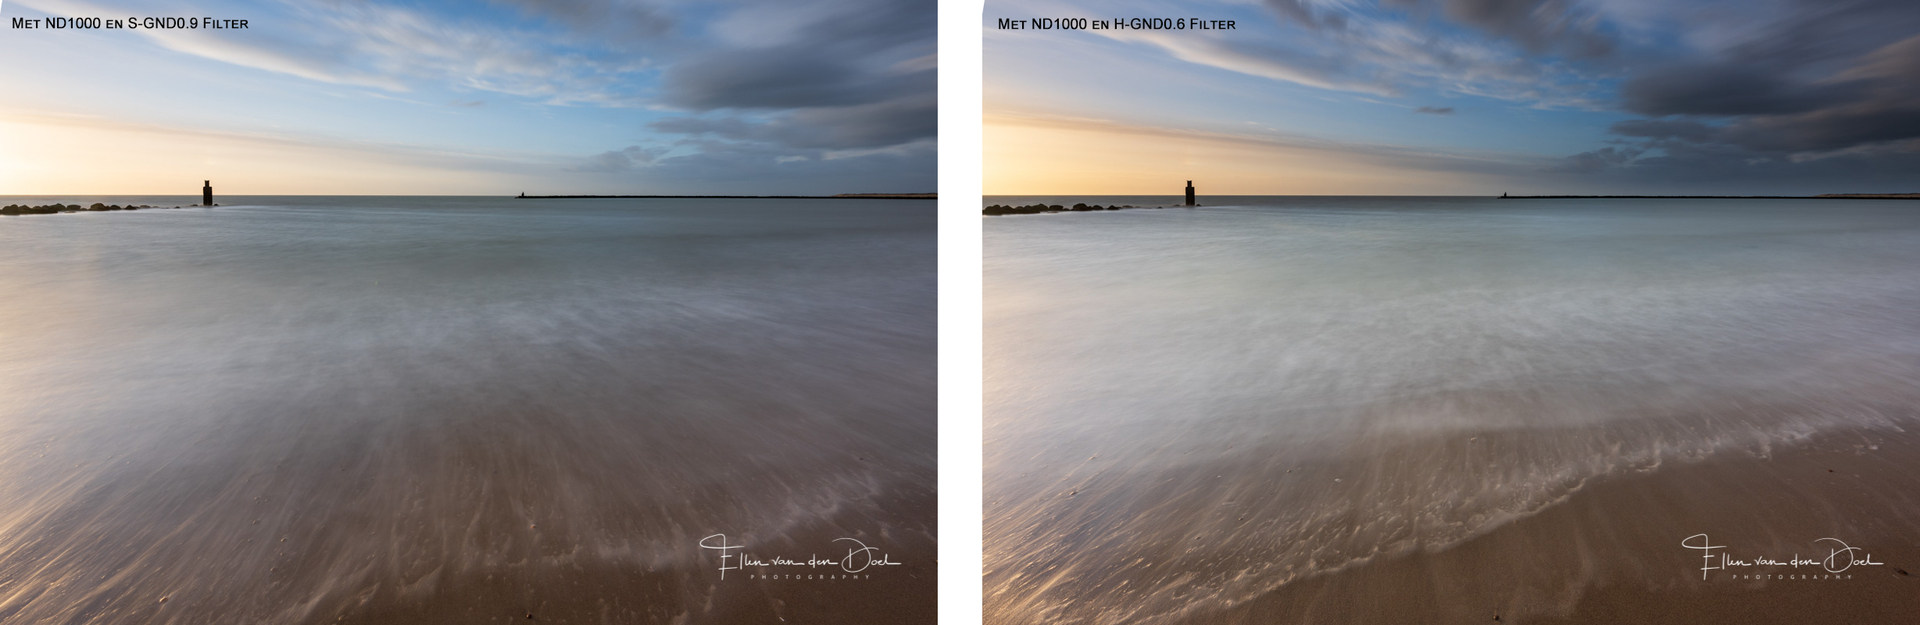
10 – stops or ND1000
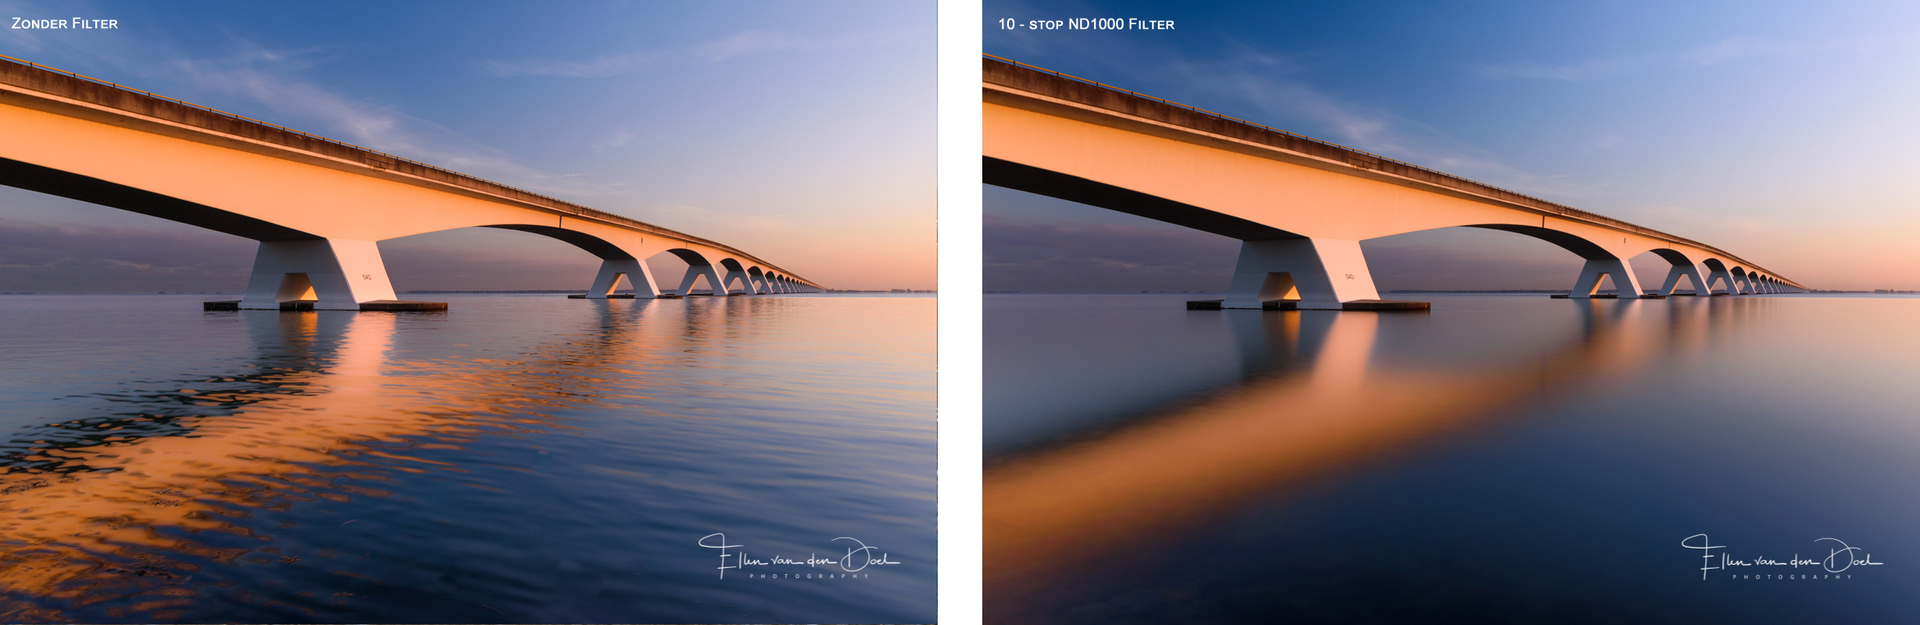
The 10-stop ND1000 filter is a must for anyone considering shooting along the coast, abstract black and white, or in urban areas with long shutter speeds, especially in bright lighting conditions.
With a 10-stop ND filter you end up with exposure times that often exceed the maximum, usually 30-60 seconds, that a camera can handle as standard. This means that you have to set your shutter speeds using the Bulb mode or an external remote control, because you usually work in a few minutes and no longer in seconds. These long shutter speeds allow you to achieve dramatic results if the composition and technique are done correctly.
In summary, the 10-stop ND filter is not suitable for sunrise and sunset and is often not the primary choice for landscape photographers working in forested and mountainous areas. More often it is the choice for photographers who work on the coast and want to significantly increase shutter speeds and capture clean, minimalist compositions.
16 – stop ND64000
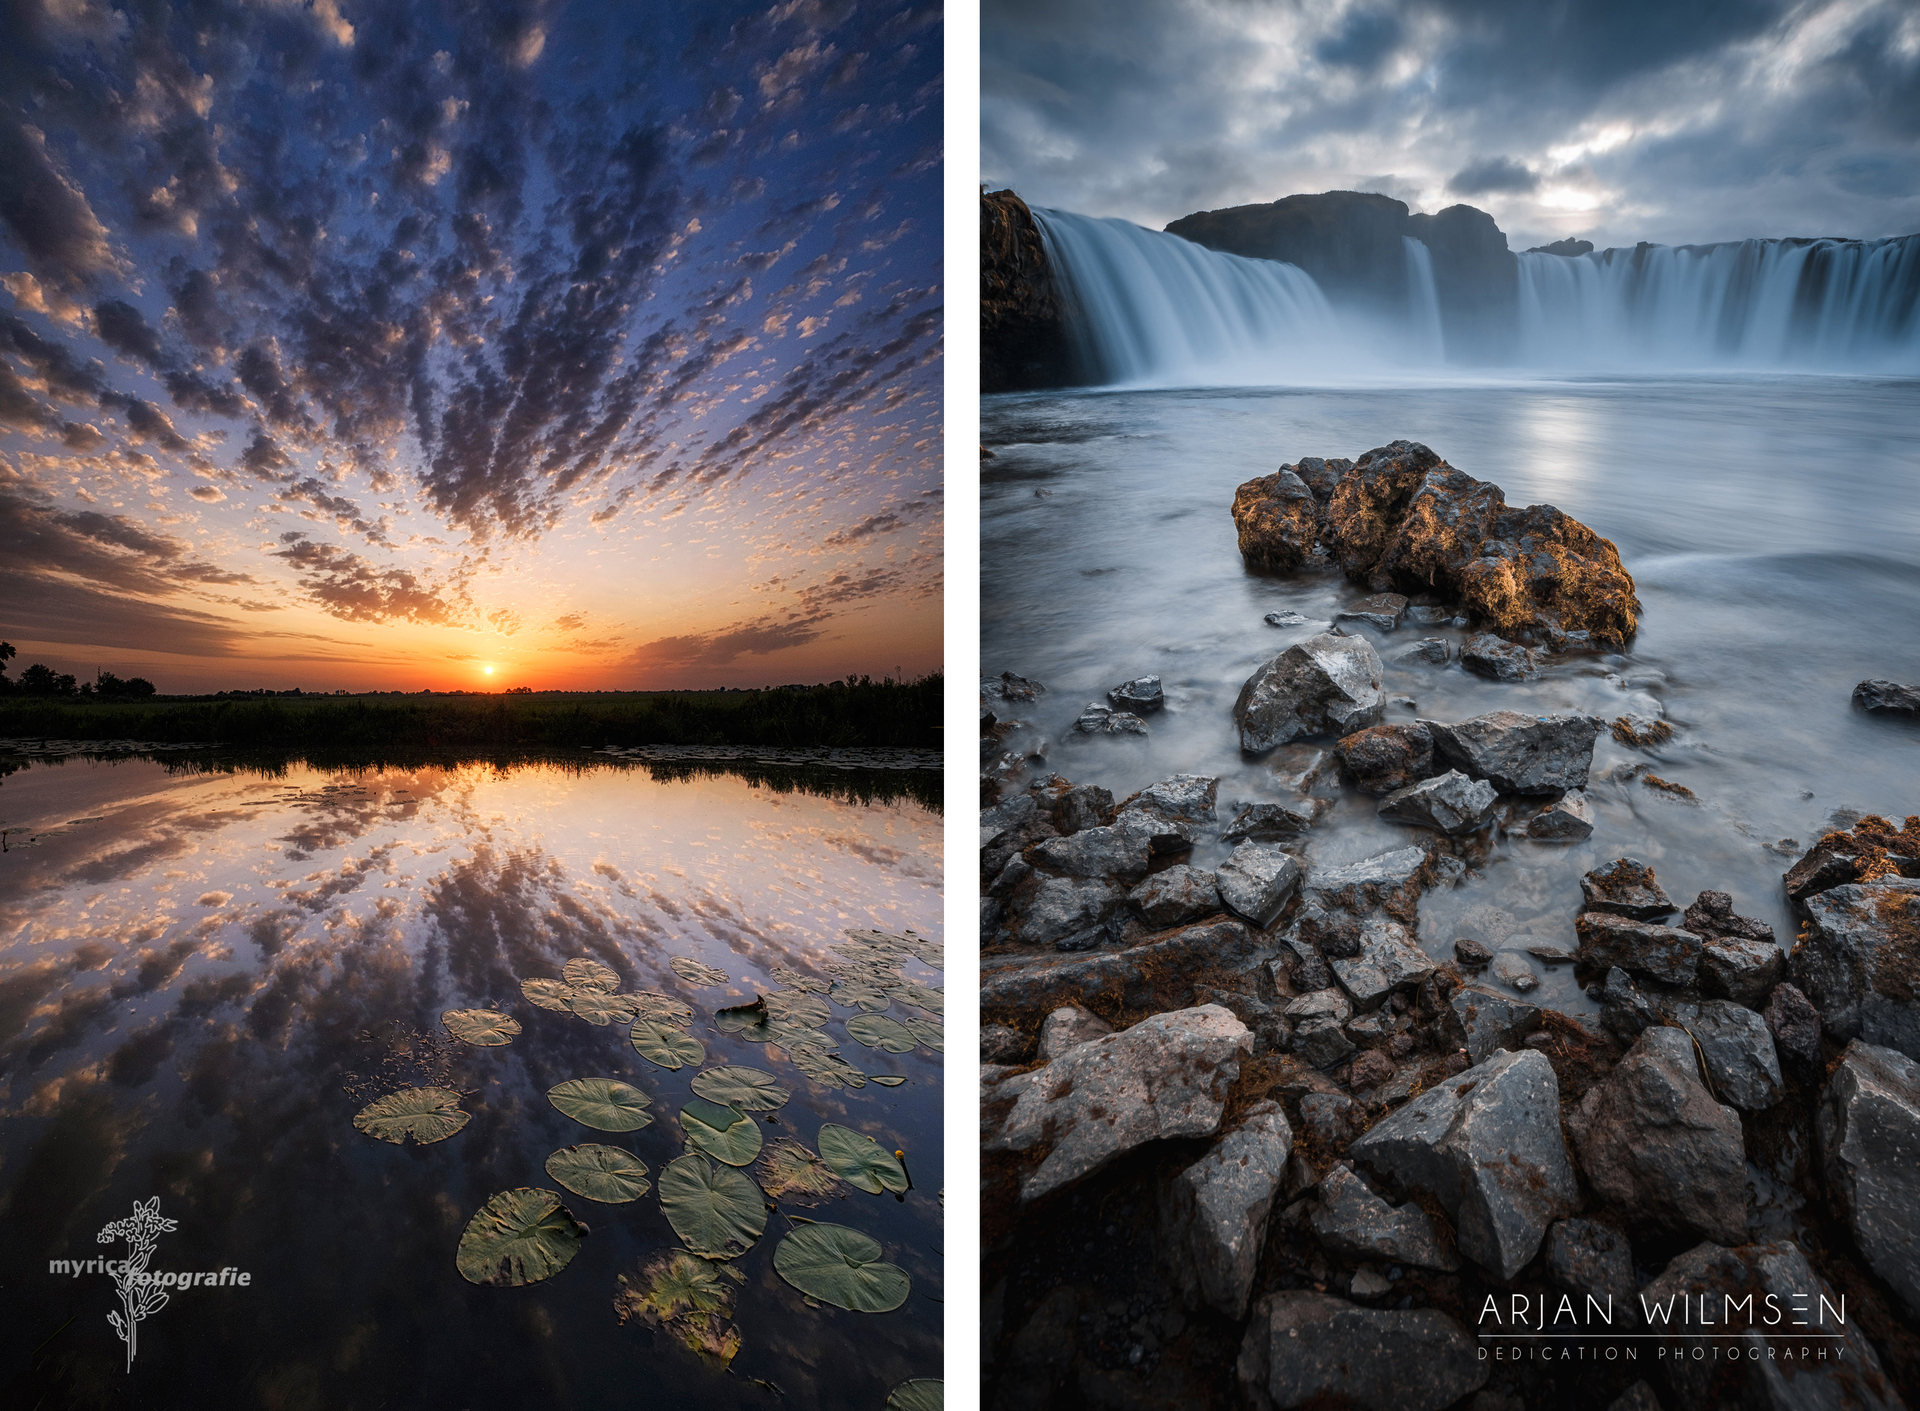
The 16-stop ND64000 filter can be considered a specialist filter, used almost exclusively by landscape photographers who want to use very slow shutter speeds to create ethereal film-like images.
A 16-stop ND filter is used almost exclusively in coastal or urban environments, to photograph with very slow shutter speeds of minutes. In this way of photographing you also need gradient filters (gray gradient filters) to control the balance of the light over the composition. Choosing this filter often requires more skill with the camera, with increased use of post-processing using programs such as Photoshop to blend and stack exposures.
Sometimes this method of photography can cause a lot of color cast. Cheaper resin ND filters in particular can have a very detrimental effect on the color balance with a color cast over the photo. Kase Wolverine glass filters hardly cause color casts and are therefore very pleasant to work with and it also saves time in post-processing, as you do not have to fix color casts. For this reason you should use the 16-stop ND filter, because you can rely on it with confidence.
Variable Density or ND Filter
Variable density filters (VDF) often have poor reviews or are often used as an introduction to filters and long exposure photography, but these filters often get a lot of criticism for the wrong reasons.
A variable density filter uses two rotating polarizing layers of glass to reduce the light reaching the sensor and because of these variable layers some filters have an additional back layer. Cross polarization (a large Regardless of the brand or the price tag attached to it, some filters have been further developed and are less affected by this. With the addition of stop meters to prevent the user from running the filter above the minimum or maximum settings and reducing the density at which the filters operate. For example; 2-8 stops, instead of 1-10 stops.
In addition, the polarized glass of a variable density filter is different from a traditional CPL filter, which is used to reduce glare and glare or saturate colors in the sky and landscape. So if you want to achieve a polarizing effect, you need a CPL.
A variable density filter is best suited for videographers, this allows the user to quickly rotate the filter without having to change fixed f-stop filters, making it faster and easier to continue filming continuously without damaging the footage. stop, while still achieving a shallow depth of field and maintaining a constant shutter speed for video in bright light.
For photographers, some of the above advantages can be useful, in wedding and portrait photography, to make an adjustment as quickly as possible on the filter, which is screwed to the front of your lens. Without losing time and missing an important shot. However, magnetic circular filters may be a better solution for photographers in this category.
As for landscape photographers, those who want to capture long exposures, sunrise or sunset can use a variable density filter, but additional methods may be needed, to reduce the impact of the cross polarization through exposure blending and creating composites, which require knowledge post-processing is required.
The variable density filter can benefit those who are looking to shoot quickly, in changing lighting conditions and are looking for convenience and not having to carry multiple filters.
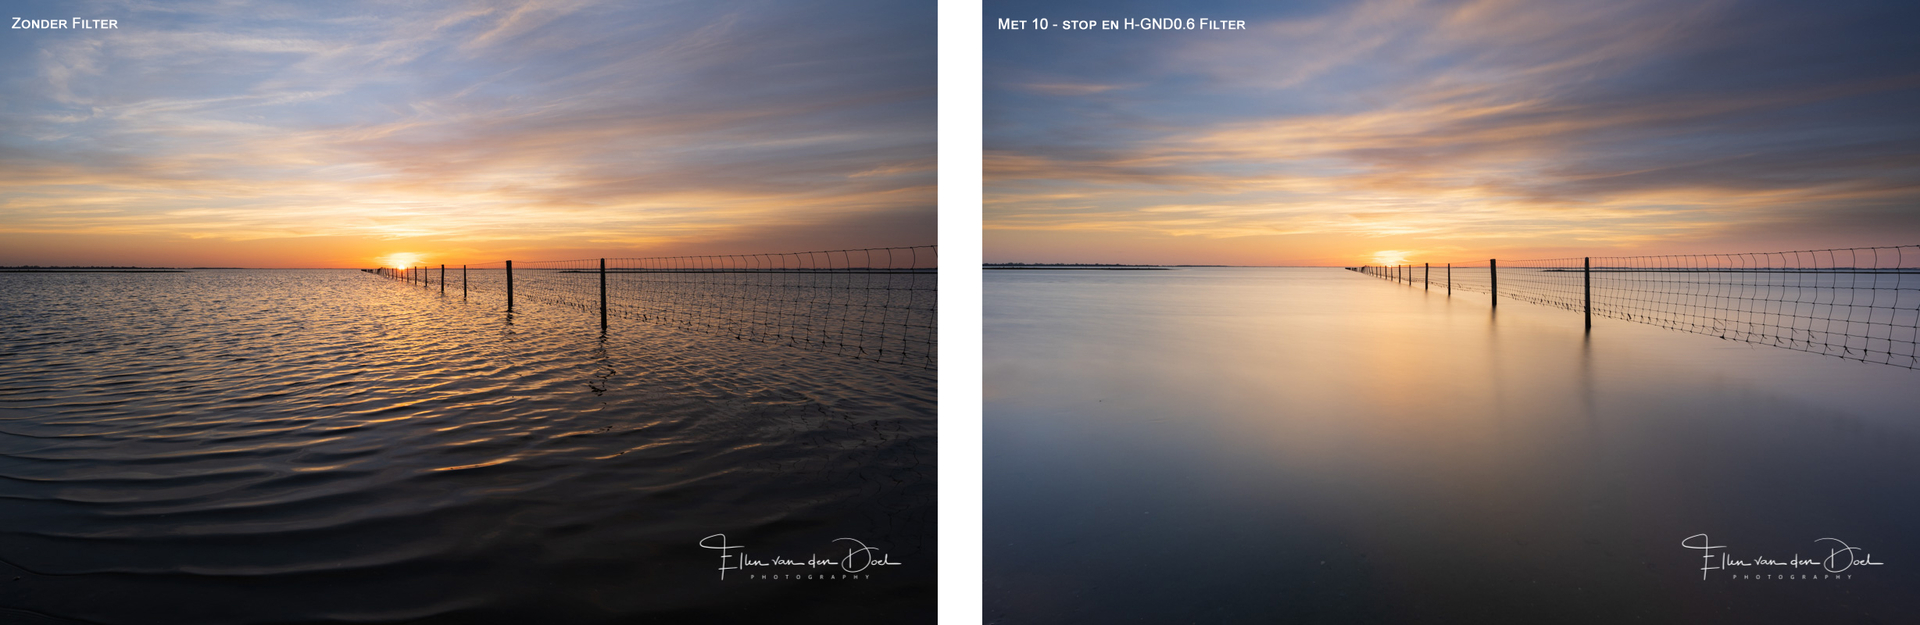
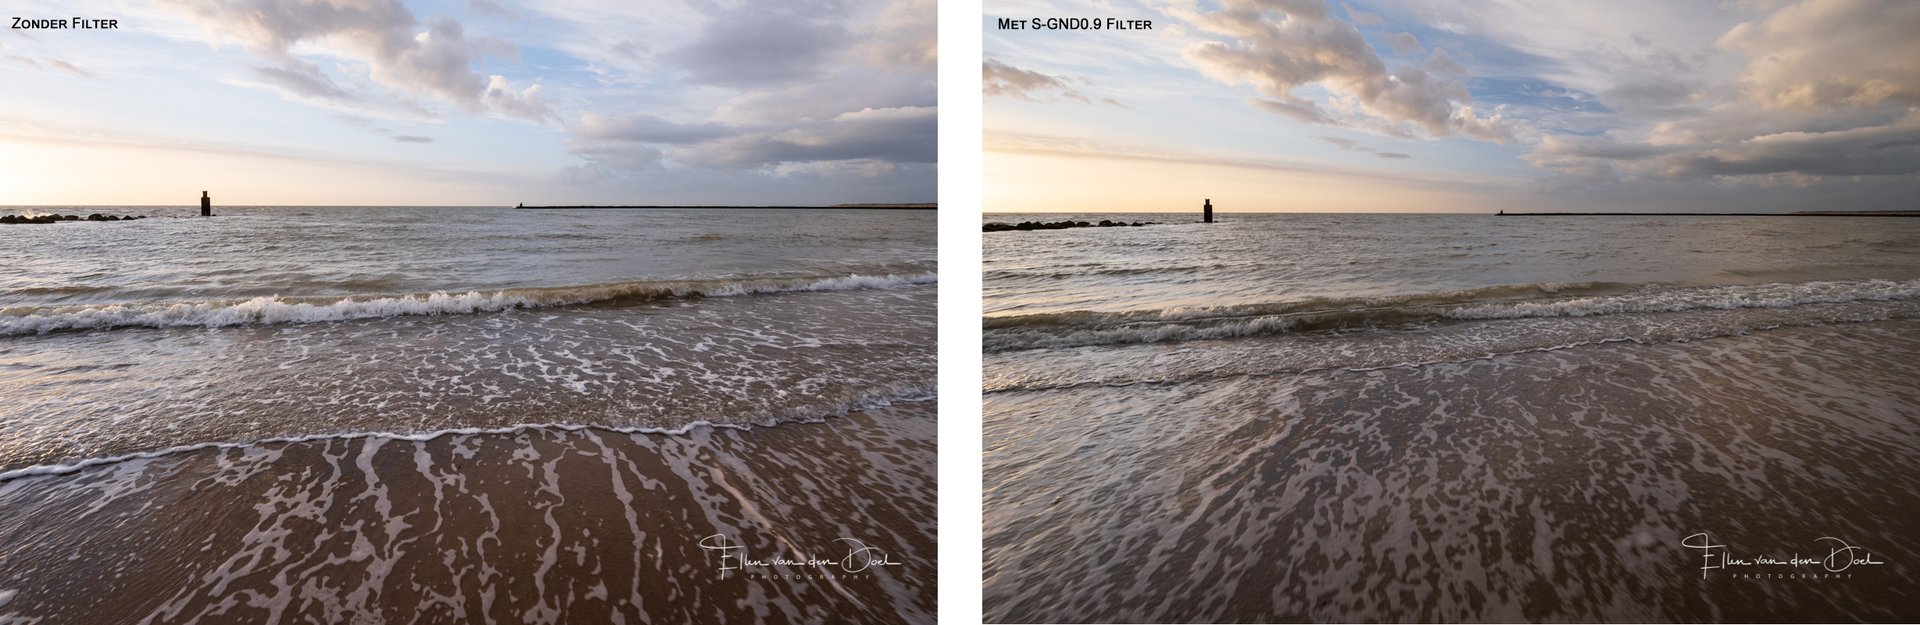
Graduated filter or GND
GND filters have a gradation (or gray gradient), which varies in strength and density across the surface of the glass filter. The filters are often half ND filter and the other half is clear, the transition is referred to as soft edge (soft), medium edge (medium), or hard edge (hard). There are also filters that are half ND, but become lighter at the top, Reverse GND filter, or only have an ND strip in the middle, Center GND filter.
A soft edge S-GND filter is best suited for mountainous, wooded or urban environments, where the horizon does not have a smooth straight transition. The soft edge of the GND filter provides a soft transition from light to dark.
A medium edge M-GND filter can also be used in similar areas to the S-GND, but care must be taken as you need to be careful of harsh lines that may appear over trees or buildings.
A hard edge H-GND filter is best used in open areas, where there is nothing on the horizon, such as coastlines and open plains. Here the transition from light to dark is clear and straight and it doesn't hurt to use a hard transition. It is even preferable.
The inverted R-GND filter and the center C-GND filter are most suitable for use when photographing the sunset and sunrise. Because the darkest area of the filter is in the center, you can still capture the colors in the sky while maintaining a well-exposed foreground.
All graduated filters come in different densities, but do not have the same depth, as fixed or variable density filters. The filters also have the GND0.6 is 2-stop, GND0.9 is 3-stop and GND1.2 is 4-stop densities. Depending on what is desirable for the recording you want to make, you can vary between the densities. Clear skies require greater density, to balance sky and foreground. For example, a sunset on the coast requires a 3 stop or even a 4 stop filter with a medium/hard edge or an inverted GND filter, but when there are trees and forests on the horizon, a soft 2 stop filter may be enough, to achieve the desired balance.
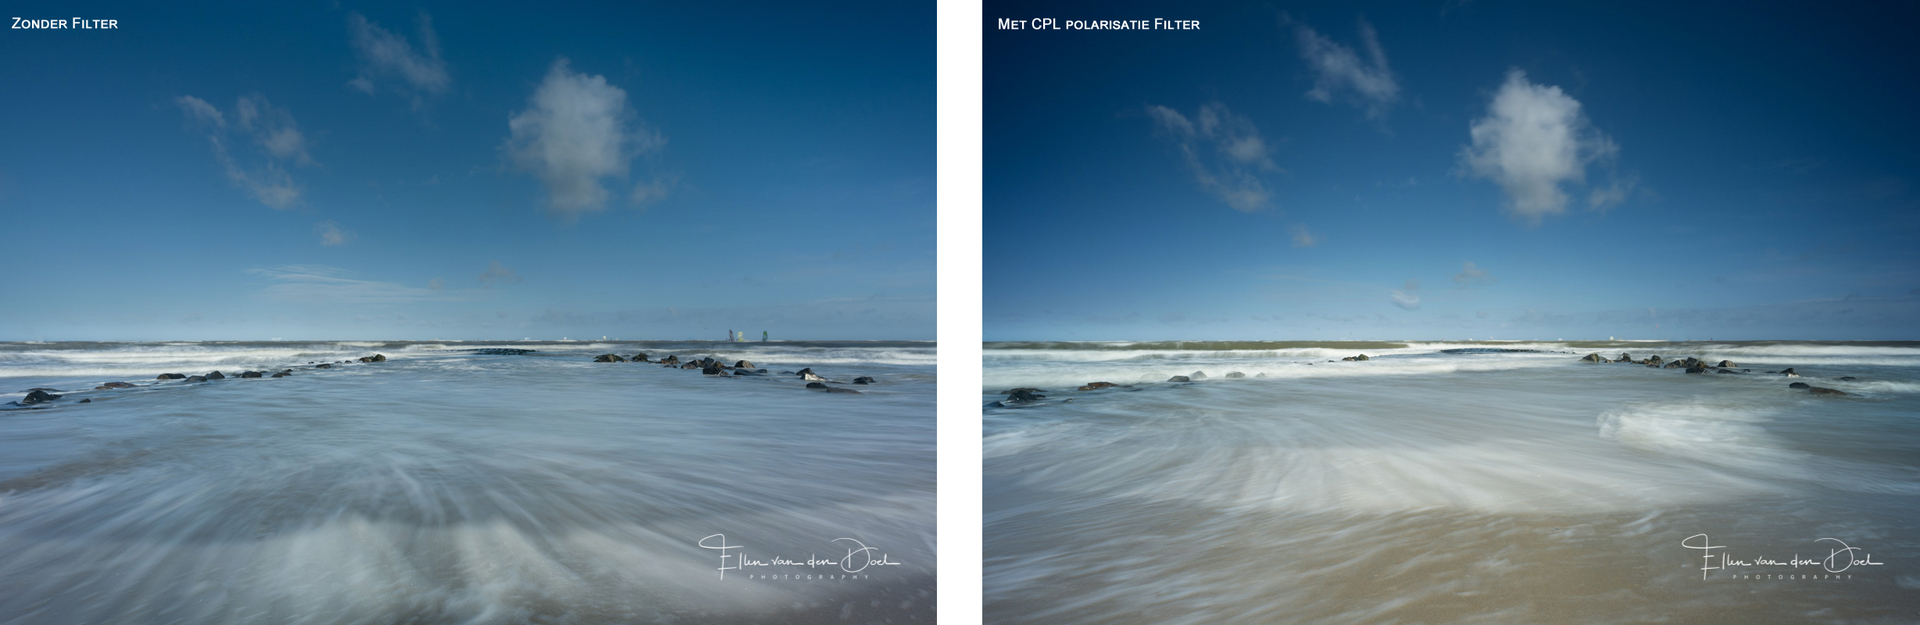
CPL filter, or polarization filter
What this filter does is selectively filter light, it only allows light to pass in one light direction; it actually functions as a very nice network. Scattered light (or 'unpolarized light') is blocked and only polarized light is allowed through.
The effect of the polarizing filter on water surfaces, when sunlight is reflected off a water surface it is scattered by the water and does not pass through the filter. However, the light that has passed through the water surface and returns from the bottom is polarized and is transmitted. What you then see is suddenly not the reflection in the water, but you can now look through the water surface to the bottom. The maximum effect for water surfaces is achieved with an angle of the camera relative to the water surface of 45º.
This works on all wet surfaces, including dewy leaves. Instead of seeing the grayish light-reflecting layer of dew, you suddenly look through the dew layer and see the true colors of the leaves.
The blue sky is also unpolarized light. You can also filter this with the polarization filter so that the blue sky becomes a deep dark blue. However, nothing happens to the white clouds, so the contrast between blue and cloud becomes even stronger, a typical Dutch cloudy sky. However, the effect on the blue sky is not always the same. You achieve the maximum effect when you photograph 90º to the sun. With the sun the effect is moderate, against the sun hardly. Is it difficult to estimate where 90º is now? Then look at your shadow and photograph perpendicular to it!
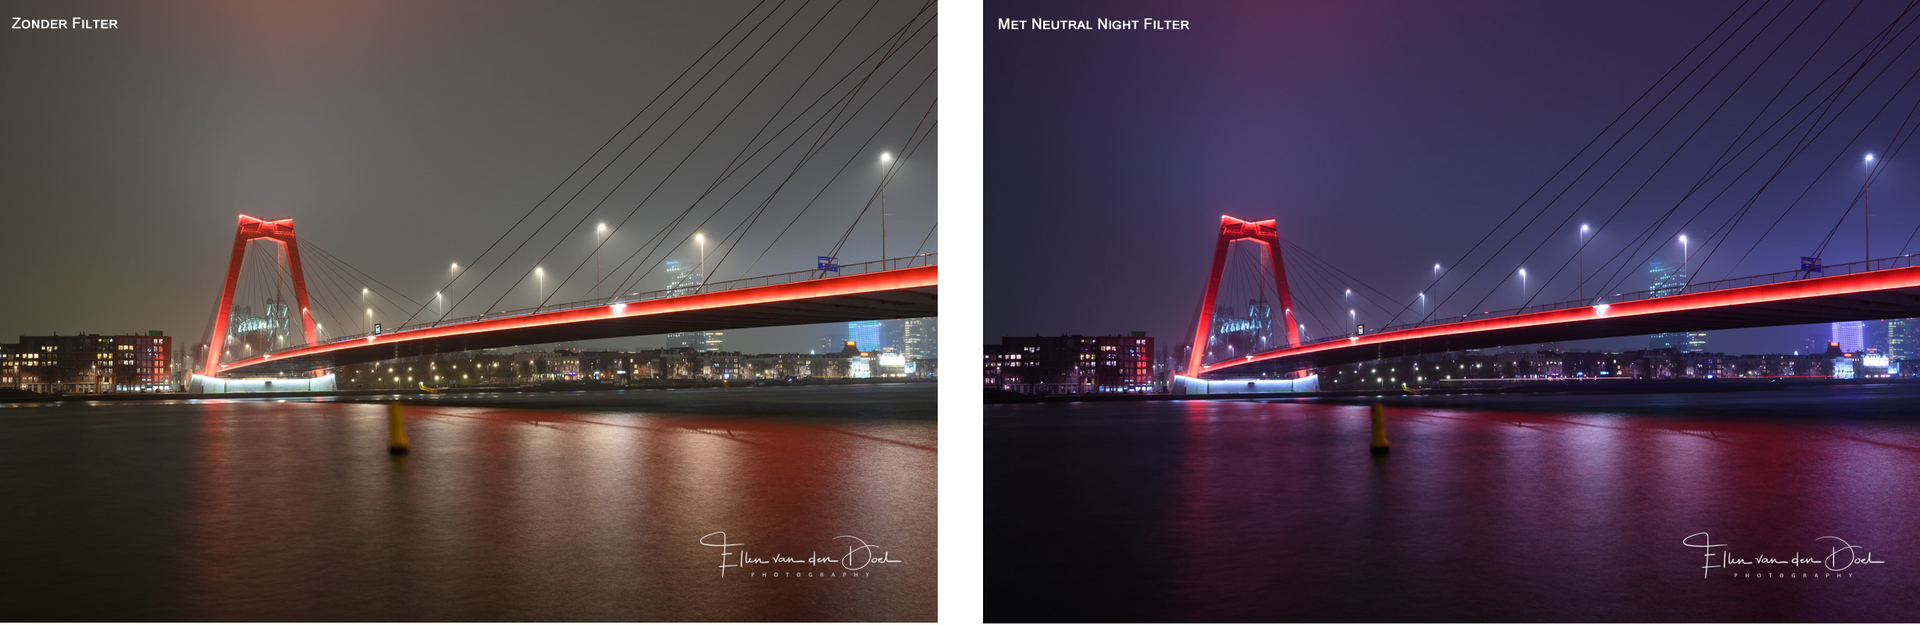
Neutral Night filter
The Kase Wolverine Neutral Night, Light Pollution Filter is a filter used to reduce the impact of artificial light when photographing at night. Light pollution is usually visible near residential areas, causing an ugly yellow artificial light to appear in the air. The Neutral Night filter gives a natural color to the night sky, creating a sharper and clearer image of the stars. The filter is made of high-quality Wolverine glass, which ensures that the filter is almost indestructible.
The Kase Wolverine Neutral Night, Light Pollution Filter is a filter used to reduce the impact of artificial light when photographing at night. Light pollution is usually visible near residential areas, causing an ugly yellow artificial light to appear in the air. The Neutral Night filter gives a natural color to the night sky, creating a sharper and clearer image of the stars. The filter is made of high-quality Wolverine glass, which ensures that the filter is almost indestructible.
Square or round
Depending on your own needs, you can choose between square or round filters, what is cumbersome for one person may be an advantage for another. Let's first take a look at the square/rectangular/square filters.
Depending on your own needs, you can choose between square or round filters, what is cumbersome for one person may be an advantage for another. Let's first take a look at the square/rectangular/square filters.
Square filters are best suited for landscape photographers who often work with long shutter speeds. The advantages of, for example, a K100-K9, the K150P and the K75 are that you can slide filters into the holder as needed to achieve balance in the exposure. Using fixed ND filters and GND filters, which you can also shift in height to determine the correct position of the transition, allowing you to work very accurately and have better control of the light.
The weaknesses of the square filters are their weight and size, compared to round filters. Investing in a square system can be expensive if you are just starting to use filters. Then, in addition to the standard sliding system, you also have the Kase Armor 100 magnetic filter system, which is much more convenient, because you can use round ND filters that fit in your holder and at the front you can use your GND filters without much effort. snap the magnetic frame onto the holder.
The weaknesses of the square filters are their weight and size, compared to round filters. Investing in a square system can be expensive if you are just starting to use filters. Then, in addition to the standard sliding system, you also have the Kase Armor 100 magnetic filter system, which is much more convenient, because you can use round ND filters that fit in your holder and at the front you can use your GND filters without much effort. snap the magnetic frame onto the holder.
Round filters are lighter and more compact, which makes them very popular with travel photographers and people who do not want to carry a lot of weight and volume. They are also quicker to change, especially the Kase Wolverine Magnetic Circular Filters.
The round GND filters are a lot less flexible in use, because they cannot be moved up or down, like the square filters, but Kase has also come up with a solution for this; a holder to slide round GND filters.
With round filters you could be more likely to have a vignetting problem, especially if you stack them.
Kase now also has the Revolution magnetic circular filter system, with handy colored rings to quickly recognize them. This series also contains an inlaid ring that fits into the thread of the lens, allowing you to place the filters closer to your lens and therefore will suffer less from vignetting. The advice for large wide-angle lenses is to use a larger filter size than your lens diameter. For example on a 72mm lens with an adapter ring 72-77mm; use filters of 77 mm.
Clip-in and Rear mount
In addition to all the filters that you place on the outside of your lens, Kase has the Clip-in system for certain system cameras, where you click a filter onto the sensor of your camera. The big advantage is that this also protects your sensor when you change lenses, because you do not have to remove the filter.
Rear filter is a new filter mounted on the back of the lens, which is small in size and portable, and has a neutral density to prevent 100% light leakage. The rear filters have the same properties as Kase's regular square and circular ND filters. They are very handy to take with you and take up considerably less space in the camera bag than a holder and square filters.
How do you know which filter is best for you?
This choice is determined by the subject you want to capture, but this can also differ per location and time of day. The amount of light is always different and you have to gain control over that. We can help you make your choice.
This choice is determined by the subject you want to capture, but this can also differ per location and time of day. The amount of light is always different and you have to gain control over that. We can help you make your choice.
You will find another useful page on our website; “Product overview” where you can see exactly what belongs to which system and what goes together.
Especially for starters, there are the Entry kits, where you can find everything you need in the basics. From the holder, the rings, a bag, the CPL, an ND filter and sometimes also a GND filter. What is also very important is which camera you have and which lenses, because it must be suitable.
The K75 system is specially made for the smaller system camera with interchangeable lenses up to a diameter of 67mm, to keep everything nice and compact. The filters for this are 75mm x 100mm and only 1.1mm thick.
The Kase K100 system is made for the larger SLR camera, which can accommodate larger lenses up to a diameter of 86mm and the filters have the size 100mm x 100/150mm, they are available in 2mm and 1.1mm thickness.
The Armor 100 magnetic system, which makes it possible to provide all square filters of the K100 system with a magnetic frame so that they can be placed on the magnetic Armor holder. This system can be used on lenses up to 95mm.
The Kase K150 system is suitable for a number of special large wide-angle lenses from certain camera brands.
Which filter is best for a landscape photographer?
The 6-stop ND64 filter and the 3-stop S-GND0.9 filter are the most versatile and useful filters in the landscape photographer's bag. With the 6 stop filter you can extend the shutter speed up to 2 minutes and with the 3 stop GND filter you can also balance the difference in exposure of the foreground and background, the land and the sky.
The 6-stop ND64 filter and the 3-stop S-GND0.9 filter are the most versatile and useful filters in the landscape photographer's bag. With the 6 stop filter you can extend the shutter speed up to 2 minutes and with the 3 stop GND filter you can also balance the difference in exposure of the foreground and background, the land and the sky.
Do you want to experiment with long shutter speeds?
The 10-stop ND1000 filter gives you the best results, for example coasts with crashing waves, turning them into calm, smooth, flat seas and urban areas with many crowds, turning them into peaceful places. You can still consider adding a GND filter to get a better balance in the sky and the foreground. This is often a matter of trying and experimenting. It often leads to surprising results.
The 10-stop ND1000 filter gives you the best results, for example coasts with crashing waves, turning them into calm, smooth, flat seas and urban areas with many crowds, turning them into peaceful places. You can still consider adding a GND filter to get a better balance in the sky and the foreground. This is often a matter of trying and experimenting. It often leads to surprising results.
Are you looking for a filter to use during film recordings?
A variable density filter or a small stop fixed ND filter is preferred. The variable density filter gives you the option to change the density while filming, without changing filters and having to stop filming, while you can still adjust your lighting conditions with a fixed shutter speed, low ISO and small depth of field.
Kase has designed the MovieMate MatteBox filter system for the more professional filmmaker.
The MovieMate magnetic MatteBox has been specially developed for the videographer. The special magnetic holder, in which both round and square MovieMate cinema filters can be used, can be easily and flexibly placed on a 95mm cinema lens, but can also be placed on a lens with a smaller diameter using the 4 supplied adapter rings.
The front of the holder has a MatteBox with a handy protective cover, which can also serve to prevent light from above.
Why Kase Wolverine Filters?
The Quality of our products. The materials used include high-quality optical glass B270, which is virtually unbreakable and has a special nano coating and is dirt and water repellent. The Wolverine series of Kase filters are professional ultra-low color cast glass filters, so without a noticeable color cast. They usually don't fall to pieces if you accidentally drop them. Photographing with Kase Wolverine series gives you a lot of satisfaction, regardless of the circumstances in which you find yourself.
The Quality of our products. The materials used include high-quality optical glass B270, which is virtually unbreakable and has a special nano coating and is dirt and water repellent. The Wolverine series of Kase filters are professional ultra-low color cast glass filters, so without a noticeable color cast. They usually don't fall to pieces if you accidentally drop them. Photographing with Kase Wolverine series gives you a lot of satisfaction, regardless of the circumstances in which you find yourself.
If you would like more information, there is also an option to follow a workshop with one of our ambassadors. They are happy to help you and answer all your questions about the use of filters and the settings of your camera.